The Raspberry Pi has a PWM (pulse width modulation) mode which can be put to use in Gambas with the help of Gordon's wiringPi library.
The wiringPi library allows access to the hardware controlled PWM feature which is output on wiringPi pin 1.
So here are some notes and a small Gambas test program to help explore its capabilities.
PWM is typically used to control the speed of motors or the power in a load in a very efficient way. The output is either "on" or "off".
When "off" there is practically no power dissipated in the drive elements (e.g. transistors or other semiconductor devices). When "on" the full voltage and current can flow through the load. By varying the on/off ratio, it is possible to directly control motor speed.
Clearly you cannot connect the Raspberry Pi gpio directly to a motor. You must use some suitable electronics to interface the two.
The software
Install and build wiringPi as described in this earlier post: RaspberryPi GPIO using Gambas.
Start a new Gambas project. You will need to run as root (as described in the earlier post).
As a minimum you will need to add the following declarations:-
Library "/usr/local/lib/libwiringPi"
Public Extern wiringPiSetup() As Integer
Public Extern digitalRead(pin As Integer) As Integer
Public Extern digitalWrite(pin As Integer, value As Integer)
Public Extern pinMode(pin As Integer, pud As Integer)
'Hard PWM
Public Extern pwmWrite(pin As Integer, value As Integer)
Public Extern pwmSetMode(mode As Integer)
Public Extern pwmSetRange(range As Integer)
Public Extern pwmSetClock(divisor As Integer)
Add to the projects main form a timer, 3 spinboxes and a checkbox.
 |
| My basic Gambas test program |
The timer is used just to update any values that you change, so set the interval to (say) 1000ms.
Add some test code:-
Public Const PWM_HARD_PIN As Integer = 1
Public Const PWM_MODE As Integer = 2
Public Sub Form_Open()
With sboxRange
.MinValue = 1
.MaxValue = 1000
.Value = 100
End With
With sboxOutput
.MinValue = 0
.MaxValue = 1024
.Value = 50
End With
With sboxDivisor
.MinValue = 1
.MaxValue = 5000
.value = 2
End With
If wiringPiSetup() <> -1 Then
Me.Text = "Looking good!"
pinMode(PWM_HARD_PIN, PWM_MODE)
pwmWrite(PWM_HARD_PIN, sboxOutput.Value)
tmrScheduler.Start
Else
Me.Text = "Cannot setup wiringPi...are you root?"
Endif
End
Public Sub tmrScheduler_Timer()
pwmSetClock(sboxDivisor.Value)
pwmSetRange(sboxRange.Value)
pwmWrite(PWM_HARD_PIN, sboxOutput.Value)
End
Public Sub chkMode_Click()
If chkMode.Value Then
pwmSetMode(0)
Else
pwmSetMode(1)
Endif
End
Time to test
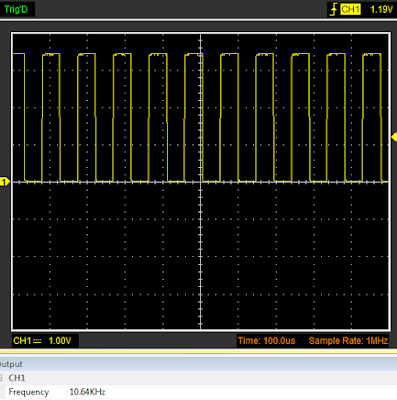
If you hang a 'scope on the GPIO pin 1 (physical pin 12) you should see something like this:-
 |
| Captured on my Hantek USB scope |
You can play around with the test code settings to vary the frequency and the mark:space ratio.
Servo Motors
Please see this more recent post.
I was hoping that this article would be the answer to my prayers but I can't get this code to work. I have Pi 3 model B+ and it all goes wrong when trying (in Gambas)to assign pinmode for pin 1 to PWM. Gambas won't "compile", saying the program has "returned the value 1". Searching the web, I'm seeing that on later models of Pi the hardware PWM clashes with the audio? Could this be my problem? Any suggestions will be gratefully received. Adrian
ReplyDeleteHi Adrian, not sure what you mean about the Gambas compile error. Yes, on Pi 3 you cannot use audio & PWM, so may need to disable audio in the config file.
ReplyDeleteCould you ask the question again on the GambasOne forum: https://forum.gambas.one/
...and include a copy of your test code. Its much easier to have a sensible, detailed conversation there, rather than trying to post code in the comments of my blog.
I look forward to seeing you there.