When your dishwasher stops washing dishes, you better fix it fast, or spend hours up to your arm-pits in soapy water, doing the washing up!
Our dishwasher started running "dry", a problem I had seen 3 years ago, so I knew just what to do.
Like most dishwashers, our Bosch LogiXX gets a lot of crap thrown at it. But the two most difficult substances for it to swallow are fruit pips and fat. The pips are usually from oranges and lemons. They whiz around the internal pipe-work until they get stuck in those rotating arms that are supposed to spray water over your crockery.
These are easily dealt with by removing the arms/propellers and taping them out. One machine I operated on while on holiday in Portugal (yes I do this kind of stuff on holiday....and in hotels while on business trips!) was very easy to clean as the arms were made in two pieces which you could un-clip for cleaning.
But the much bigger problem is fat. In our Bosch, when the water fills the sump, the oily fat must float on the surface and get into the elaborate infeed pipe and control structure. This slows down the delivery of fresh water, such that eventually we only get maybe half the amount required during the wash cycle. The net affect is that the spray from the rotating arms is too feeble to reach the very expensive soap tab. So we end up with dirty dishes and a soggy soap tab, either stuck to the door or attached to the nearest dinner plate.
Although these notes relate to the Bosch dishwasher, the general principles may be helpful when dealing with other brands.
To gain access to the internals on the LogiXX the lid must first be removed.
Health & Safety Notice: don't even attempt this if I have to tell you to un-plug the machine before starting!
Dismantle The Washer
From the back of the machine, press the 2 plastic lugs upwards and pull the lid backwards.Open the front door and undo the 2 Torq screws on the left edge.
Carefully pull the front edge of the left side panel out, then back to clear the plastic pin at the rear. The panel should then be lifted clear of the machine.
You should now see all the cleaver gubbins. We need to remove the large plastic slab which is the tank which stores cold water, but if you lift it out now it will dump its load on your floor. There is probably a very smart way to do this, but I run the machine in Quick Wash mode, sit on the floor with a glass of wine, and wait. Wait until the machine has drained most of the water into the sump and then turn off the in-coming water supply (if you turn it off too soon, the machine beeps at you). Now wait till the end of the cycle so the water in the sump is pumped out.
Remove the screws holding the 2 horizontal bars, then push them backwards to release. Remove the front plastic corner piece which is retained on metal lugs.
Now remove the rear plastic corner piece by removing the fixing screw.
Removing The Water Tank
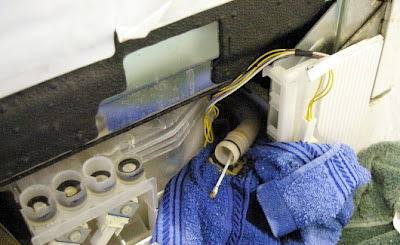
Lift the plastic tank upwards to clear the fittings, being carefully not to damage the rubber seals. (Did I tell you to lay down a couple of old towels?).Now you need to lay an old towel or something under the pipe that feeds the sump, because you aint gonna believe what happens next!
Release the circular component with the microswitch, and then carefully pull the main float module upwards to release.
Now pull the sump pipe away from the float module. Although water has probably flooded through to the base of the machine, hopefully the gunk has been filtered by the towel.
You need to get as much fat out of this pipe as possible, using a combination of cotton bugs, kebab sticks or anything you can poke it with. If you have a pipe cleaner, so much the better.
Its also a good idea to break down the float module and give it a good clean.
...before and after...
Before you put this module back, try to mop up any water in the base of the machine. The base contains a circular float which is attached to the module via a red connecting rod. If the machine floods water into the base, the float rises, and the rod operates a cut-out switch to shut the water off.
The Moment Of Truth!
Time to put it back together, but leave the lid and side panel off for the moment so you can watch it during the trial run. Hopefully, now that it has been cleaned, you should see the tank completely empty during the wash cycle. Open the door during the wash to check that you have a healthy spray of water coming out of he propellers.Refit covers. Job done!


No comments:
Post a Comment